Welcome to MOTOsafety!

This simple step-by-step guide will walk you through activating your account and installing your GPS tracker. You’ll also find easy instructions to customize your Customer Portal for tracking vehicles, monitor reports, set alerts, and much more. Let’s get started!

If you prefer, you may also download this information in a PDF.

Step 1: Activate your account

  1. Open your web browser (Chrome is recommended) and go to: https://activate.motosafety.com
  2. You will be directed to the Activation Page where you will finish your account registration. Fill out the following information:
    • Activation Code: You can enter either the Activation Code found on your device OR your Billing Account Number (BAN) provided in your confirmation email.
    • Email Address: Please use the email address you provided when completing the order.
    • Create/Confirm Your Password: Make it strong and secure!
    • Read through our Terms & Conditions and then click the radio box to agree before clicking “Next”.

Activation

Step 2: Device Activation

  1. Welcome to your portal!
    • If you entered in your activation code on the previous screen it will auto populate here.
    • If you entered your Billing Account Number (BAN), you will need to enter the activation code shown on your device here.
  2. Name your tracker based on the naming convention you use to manage your vehicles.
    • Some common ways to name your vehicle: Blue Truck, Van ##, Sophie’s Car, Ford F150, Tractor ###, etc.
  3. Enter in any optional information you would like to add for your tracker.
    • Tip! If you are adding trackers into multiple groups, complete Group Setup before activating the remainder of your devices.
  4. Congratulations! You have now set up your first device and your portal has been activated for use. From here, you can either choose to Activate More Trackers or Complete the process and begin using your system.

Device Activation

Step 3: Installing Your Wired Tracking Device

  1. Wiring the device into a vehicle is easy, and requires installation inside the passenger compartment of the vehicle. The MOTOsafety wired device has a series of wires — you will only need to attach three of these wires to your vehicle (the additional wires are for future features or functions). The three wires you need are: the red wire (power), the longer of the two black wires (ground) and the white wire (ignition sense).
    1. Find the constant red power wire in your vehicle. Cut and strip this wire.
    2. Cut and strip the red wire on the MOTOsafety GPS device.
    3. Connect the two red wires and crimp. This connection provides power to the device.
    4. Connect the MOTOsafety black wire to your vehicle’s chassis. This connection serves as a ground for the device.
    5. Locate the vehicle’s ignition wire (reference the vehicle’s wiring diagram in order to locate).
    6. Verify the ignition wire by measuring the operating voltage while the key is turned to the ON or START position (the voltage should read 0 VDC when the key is in the off position, and typically between 11V and 14V when in the ON position).
    7. Connect the white wire on the MOTOsafety device to the vehicle’s ignition wire. This connection allows the device to report ignition OFF and ON events.
    8. An optional plastic zip tie is included to secure the device under the vehicle dash with the label that reads “Label Side Down” facing down.

      Visit www.motosafety.com/wiredinstall to watch a video on the installation process.

  2. Confirm the power connection.

    Following installation, allow 5-10 minutes for the MOTOsafety device to power up and obtain a cellular and GPS fix. Your vehicle must be outside and not in a covered area so that it will receive GPS signal. When working properly, the blue light will blink once every 3 seconds and you will see a blinking green light.

    You should see your car’s location on the map (may take up to two hours).

wired lights

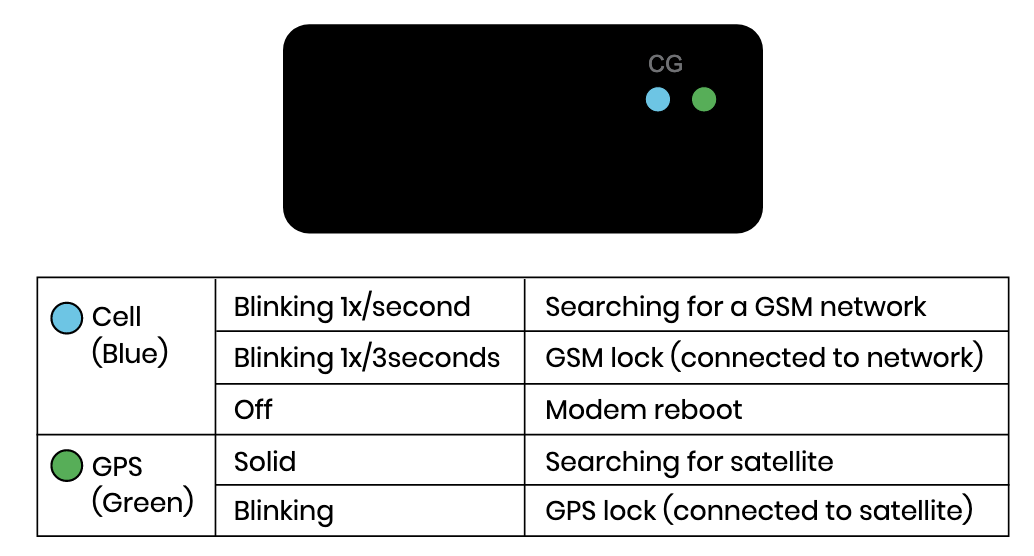
Please note: Should your vehicle require a jump start, you will have to replace the fuse in the wiring harness with a 3 volt fuse.

That's it! You're ready to start tracking.

Now it's time to start customizing your account. Our handy PDF guides will walk you through setting up users, geofences, alerts, and more.

Account Setup Guides

Back